Data Quality Testing - The What, How, Why ... Tools and Practices


This is a long read, so let me first tell you what exactly you’ll be getting out of reading this article.
- Understanding the importance of data quality and data testing
- Explore the main differences between two of the most prominent data testing tools (Great Expectations and DBT) with a data issue use-case
Now let’s dive in.
We are a firm believer of evidence-based decision making. Taking a decision when you’re well informed and well-researched, usually results in a better outcome.
If someone were to ask you to recommend a movie, you would most probably follow up with questions like what genre do you usually enjoy? What is the last movie you’ve watched and liked? Etc.
Humans naturally observe and subconsciously form conclusions from information and experiences they’ve had in the past.
But hold up, what if the data you gathered is inaccurate? What if your friend told you they really loved the movie Twilight (1998), and you thought they meant the 2008 vampire Twilight movie. The recommendations you would make then would be pretty far off.

So not all information you gather and analyze leads to accurate decision-making.
Data collected needs to be right.
The worst thing your friend would do right now is never call you up again for movie recommendations, but if a whole business’s decision-making relies heavily on the data gathered, and that data is corrupted or inaccurate, that could be very costly.
What is bad data?
Good data is data that matches whatever behavior you expected. If we expect that a column shouldn’t have any null values then it should not.
Let’s take an example.
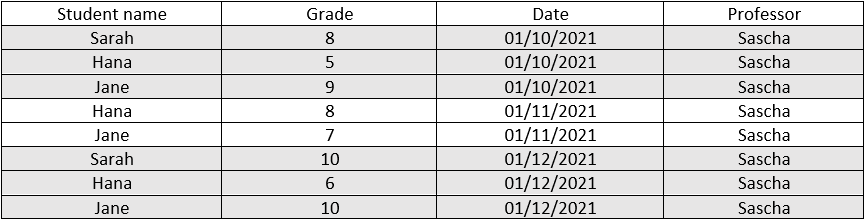
Say all university professors are required to enter all evaluation grades at the beginning of every month, so that all students' GPA is automatically calculated at the end of each academic year. We expect to find a grade record for every student each month. If some students skip an exam, then there still should be a record stating they scored a zero.
Professor Sascha forgot to enter student Sarah‘s quiz grade for the month of November. Unlike Jane and Hana, Sarah’s time series graph has a discontinuity, which leaves room for a person observing the data records to wonder if Sarah had skipped the exam and should score a zero or if she did attend but professor Sascha forget to enter the grade on to the system.

By the end of year 2021, when the final GPA is posted on each students account there would be two scenarios:
Scenario #1:
Sarah believes she should have scored a higher GPA and heads to the administration asking them to recheck her grade. The administration wastes a day going through previous test results, until it finds that one missing record and contacts Dr. Sascha for an explanation.
Scenario #2:
Sarah doesn’t notice that there was an issue when calculating her GPA, and is unfairly graded.
So is there a way that the administration could have not wasted an entire day tracing back the issue? Is there a way to ensure that no student in the future is unjustly evaluated?
Yes … Let’s test our data
If the yearly_grades table was automatically checked every month to ensure that no students records were missing, we wouldn’t have had to wait till the end of the year to discover any hidden issues.
Testing is not an unusual word to hear when talking to a software engineer. Automated testing/ unit tests is what ensures that all code meets quality standards before it’s deployed. We should start applying the same concept of unit testing on data as well.
What are the features that would make a good data test
-
Descriptive name
Anyone who reads a tests name should automatically know what it is supposed to do without having to delve into the code to figure that out. -
Direct and Clear
When a data test fails, we should be able to know what that means.
Example:- A test that expects a column mean to be equal to 5, when that fails, then we know for a fact that the mean was anything but 5
- A test that expects a column mean to be equal to 5 and not have any null values, when that fails, we wouldn’t know which condition caused the failure.
Rule of thumb: if you create a test and you can’t name it then that probably means you’ve involved too many conditions, so break it down into different tests
-
Automated
This is an important feature to have. You don’t want to manually run your tests. You want to be able to combine the tests that operate on a certain table together and schedule an auto-run task to test your data periodically. -
Efficient
Your test should not take a very long time to run. Of course this factor depends on the amount of data you’re testing, but generally it shouldn’t exhaust a lot of time. If it does, break the test down or test a smaller sample of data. -
Independent
Each test shouldn't depend on other tests. It should be able to run at any time and in any order.
Now that you know what makes a good data test, let’s dive deep into discussing how to apply those features and practically test our data.
Different tools for Data Testing
There is an increase in the level of interest in data quality and testing and this apparent by the number of the open-source data testing tools currently available to use. The most prominent ones are Great Expectations (GE), Data Build Tool (DBT) , Deequ and Soda SQL .
In this article we will focus on both GE and DBT, both tools are open-source projects. GE is a tool primarily built only for data testing, while DBT has many features and one of which is data testing. GE supports data testing for not only SQL-based data sources, but also pandas and spark, while DBT supports testing for only SQL-based data sources and you have to write the tests in SQL as well. Note that DBT supports Spark through Spark SQL.
If you have pandas or spark data sources and you want to write your test using either SQL or python then your data tool of choice would be GE for obvious reasons. However, if you have an SQL-based data source, which tool you should use to test your data is the question we plan on helping you answer in this article.
Our Data warehouse is on Snowflake, so this is the SQL-based data source we used to test both data tools in this article.
Great Expectations [ 0.13.39 || v3 api]
The two key things you need to be comfortable with when working with GE are python and SQLAlchemy. GE has a lot of different terminologies that aren’t necessarily intuitive to learn, so let’s discuss them first.
Expectations: These are basically your tests. They are what you “expect” from your data. All tests in GE follow the features that make a good data test discussed above. GE comes already with around 40-50 tests for you to use. You can also create your own custom test which is a feature we’ll be discussing ahead.
Examples of available tests:
- expect_column_values_to_be_increasing
- expect_compound_columns_to_be_unique
- expect_column_pair_values_A_to_be_greater_than_B
- expect_column_mean_to_be_between
- … and many more
Expectation Suites: An expectation suite is a set of Expectations, a group of related tests combined together in a test suite. An example of that would be choosing to combine expectations based on severity level; tests that should only flag a warning notification on failure are placed in an expectation suite, while tests that should flag an error are placed in another suite.
Batch Request: A batch of data you as a user retrieve for testing. This is where you determine what data source to use to access the data, and what type of data connector.
Data connectors: There are two types of data connectors Runtime Data Connector and Inferred Asset SQL Data Connector. Runtime Data Connector is used when you want to read an SQL query at runtime, but when you want to read a whole table or view use Inferred Asset Data Connector.
Validator: When you just want to quickly explore your data, a validator helps you achieve that. A validator combines a batch request with an expectation suite for testing.
Checkpoints: They combine testing multiple batches against one or several expectation suites and vice versa. Checkpoints are also responsible for any actions you want to take based on the validation results (sending a slack notification/email etc.)
Data sources: Data sources are wherever your data lies. We tested both MSSQL and Snowflake as data sources with GE, and we do not recommend using MSSQL as a data source. MSSQL Server has been one of GE’s least used and most experimental back-ends. They do support it, but it doesn’t have full integration testing and monitoring, so it is still technically in the experimental phase. While using Snowflake; however, we did not face any issues.
Data Docs: A representation of all expectation suites and validation results in the form of HTML where you can share with non-technical data stakeholders.
Stores: There are different stores, it is the location where your validation results, data docs, and expectation suites are stored.
Data Context: This is what a GE project is called. Data Contexts encapsulate all GE configuration is the form of a yml file with information like which directories each store (Validation/Expectation/Data Docs) are stored in, which data sources and data connectors are available etc.
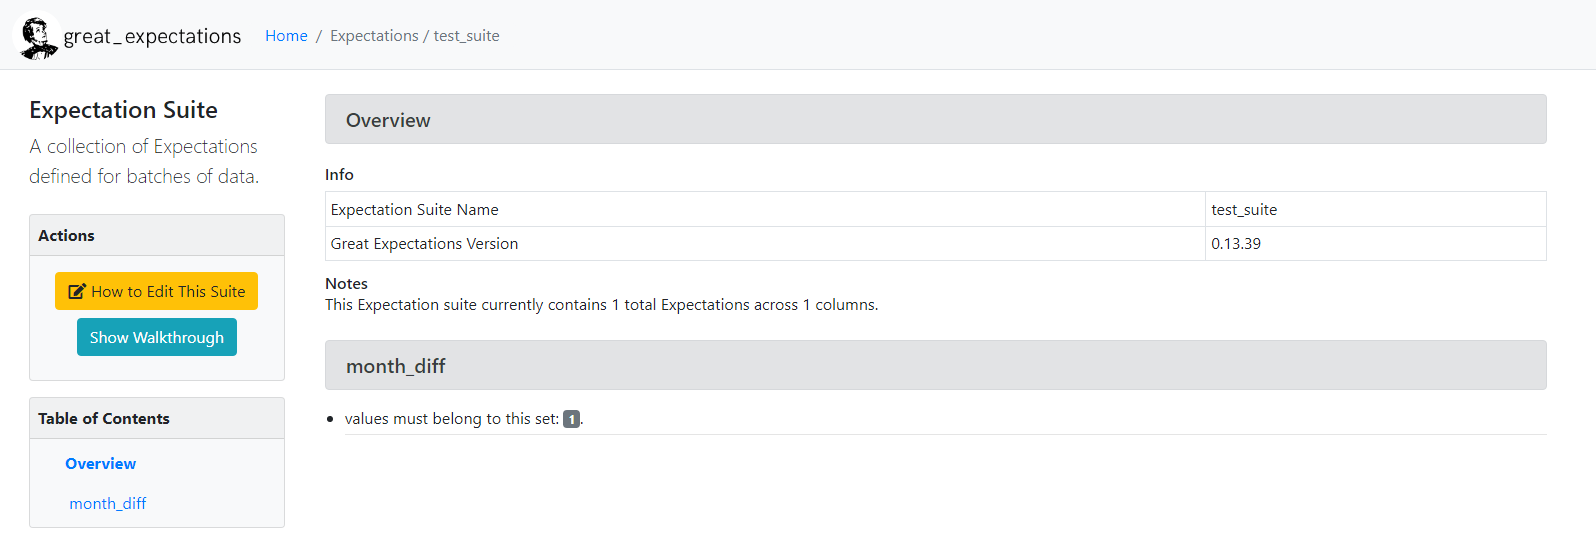
Testing the yearly_grades table with GE
Let’s first agree on the query we will be using to detect the issue. We will order the dates inserted per student and start calculating the difference in months between each month and the one directly preceding it.
We expect that the month difference should always be equal to one.
SELECT student_name,previous_date,curr_date,DATEDIFF(MONTH,previous_date,curr_date) AS MONTH_DIFF FROM(
	SELECT student_name,date as curr_date,LAG(date) over(
		PARTITION BY student_name ORDER BY date
	) as previous_date
	FROM yearly_grades
)
After you’ve initialized your data context and configured your data source in the great_expectations.yml file as follows
datasources:
  snowflake_datasource:
    module_name: great_expectations.datasource
    data_connectors:
        read_with_sql_query:
            batch_identifiers:
                - default_identifier_name
            module_name: great_expectations.datasource.data_connector
            class_name: RuntimeDataConnector
        read_with_table_name:
            module_name: great_expectations.datasource.data_connector
            class_name: InferredAssetSqlDataConnector
    execution_engine:
        module_name: great_expectations.execution_engine
        credentials: #insert your own credentials
            host:
            username:
            database:
            password:
            drivername: snowflake
        class_name: SqlAlchemyExecutionEngine
    class_name: Datasource
You will create a RuntimeBatchRequest with the following parameters:
Datasource_name: the data source name you configured in the great_expectations.yml file. In this example, our data source is called snowflake_datasourceData_connector_name: the name of the data connector of type RuntimeDataConnector as we will be using an SQL query to retrieve our data. In this example, we called our RuntimeDataConnector ,read_with_sql_query.Data_asset_name: the name of the new table that will be formed as a result of the query.Runtime_parameters: The query needed is inserted as runtime parameters
batch_request = RuntimeBatchRequest(
    datasource_name="snowflake_datasource",
    data_connector_name="read_with_sql_query",
    data_asset_name="month_diff_table",  # This can be anything that identifies this data_asset for you
    runtime_parameters={"query": "SELECT student_name,previous_date,curr_date,DATEDIFF(MONTH,previous_date,curr_date) AS MONTH_DIFF FROM(SELECT student_name,date as curr_date,LAG(date) over(PARTITION BY student_name ORDER BY date) as previous_date FROM yearly_grades)"},
    batch_identifiers={"default_identifier_name": "default_identifier"},
)
You will then create an empty expectation suite to encapsulate all your tests. We called our suite test_suite. Then, you will create a validator object and combine the batch_request with the test_suite expectation suite.
context.create_expectation_suite(
	expectation_suite_name="test_suite",overwrite_existing=True
)
{
"meta": {
"great_expectations_version": "0.13.39"
},
"ge_cloud_id": null,
"data_asset_type:: null,
"expectation_suite_name": "test_suite",
"expectations": []
}validator = context.get_validator(batch_request= batch_request,expectation_suite_name="test_suite")Let’s view the validator table to view the result of the query before applying any test.
column_names=[f'"{column_name}"' for column_name in validator.columns()]
print(f"Columns: {', '.join(column_names)}.")
validator.head(n_rows=5,fetch_all=False)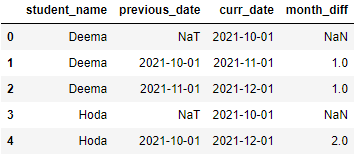
We can then directly apply tests on the validator object. Here we will use GE’s test expect_column_values_to_be_in_set and state that we expect the month_diff column to be equal to one. The result_format is set to COMPLETE; meaning we want GE to return all details of the failed/succeeded test.
As we can see here, it stated that the unexpected_count was one record which is 20% of the data and the unexpected value found was month_diff of two. However, it doesn’t return any identifier of the record so we can’t really trace back that Sarah was the one with the missing record.
validator.expect_column_values_to_be_in_set("month_diff",[1],result_format="COMPLETE"){
"meta": {},
"result": {
"element_count": 8,
"unexpected_count": 1,
"unexpected_percent": 20.0,
"partial_unexpected_list": [
2
],
"missing_count": 3,
"missing_percent": 37.5,
"unexpected_percent_total": 12.5,
"unexpected_percent_nonmissing": 20.0,
"partial_unexpected_index_list": null,
"partial_unexpected_counts": [
{
"value": 2,
"count": 1
}
],
"unexpected_list": [
2
],
"unexpected_index_list": null
},
"exception_info": {
"raised_exception": false,
"exception_traceback": null,
"exception_message": null
},
"success": false
}What if we don’t want the test to fail when only one record was returned. We can customize our test in GE with the mostly parameter. mostly is a special argument that is automatically available in most expectations. mostly must be a float between 0 and 1. Great Expectations evaluates it as a percentage, allowing some wiggle room when evaluating Expectations: as long as mostly percent of rows evaluate to True, the Expectation returns "success": True. So in the above example, If we set the mostly parameter to 0.8, meaning at least 80% of our data should be correct, the test will pass.
validator.expect_column_values_to_be_in_set("month_diff",[1], result_format="COMPLETE", mostly=0.8){
"meta": {},
"result": {
"element_count": 8,
"unexpected_count": 1,
"unexpected_percent": 20.0,
"partial_unexpected_list": [
2
],
"missing_count": 3,
"missing_percent": 37.5,
"unexpected_percent_total": 12.5,
"unexpected_percent_nonmissing": 20.0,
"partial_unexpected_index_list": null,
"partial_unexpected_counts": [
{
"value": 2,
"count": 1
}
],
"unexpected_list": [
2
],
"unexpected_index_list": null
},
"exception_info": {
"raised_exception": false,
"exception_traceback": null,
"exception_message": null
},
"success": true
}Now that we have explored how to test our data using a validator, let’s test it out using a checkpoint. The checkpoint we will create is called month_diff_checkpoint. It encapsulates the test_suite and batch_request we created before and adds to it some actions.
- Store Validation Results Action: This allows the checkpoint to store the validation results in the configured directory. By default the directory is:
great_expectations\uncommitted\validations\test_suite - Update Data Docs Action: This allows the checkpoint to update data docs with the existing expectation suites and validation results stored. By default the data docs are stored in the directory:
great_expectations\uncommitted\data_docs\local_site - Slack Notification Action: This is user-configured. You will have to add your own slack webhook in order to receive notifications. You can also customize if you want to notify
on success,on failure, oron all. Here we’ve configured it toon all.
name: month_diff_checkpoint
config_version: 1.0
template_name:
module_name: great_expectations.checkpoint
class_name: Checkpoint
run_name_template: '%d-%m-%y-test-suite-trial'
expectation_suite_name: test_suite
batch_request:
action_list:
- name: store_validation_result
action:
class_name: StoreValidationResultAction
- name: update_data_docs
action:
class_name: UpdateDataDocsAction
- name: send_slack_notification_on_validation_result
action:
class_name: SlackNotificationAction
slack_webhook: #insert your own webhook
notify_on: all # possible values: "all", "failure", "success"
notify_with:
- local_site # optional list containing the DataDocs sites to include in the notification. Defaults to including links to all configured sites.
renderer:
module_name: great_expectations.render.renderer.slack_renderer
class_name: SlackRenderer
evaluation_parameters: {}
runtime_configuration: {}
validations:
- batch_request:
datasource_name: snowflake_datasource
data_connector_name: read_with_sql_query
data_asset_name: month_diff_table
runtime_parameters:
query: SELECT student_name,previous_date,curr_date,DATEDIFF(MONTH,previous_date,curr_date) AS MONTH_DIFF FROM(SELECT student_name,date as curr_date,LAG(date) over(PARTITION BY student_name ORDER BY date) as previous_date FROM yearly_grades)
batch_idenitifiers:
default_identifier_name: default_identifier
profilers: []
ge_cloud_id:
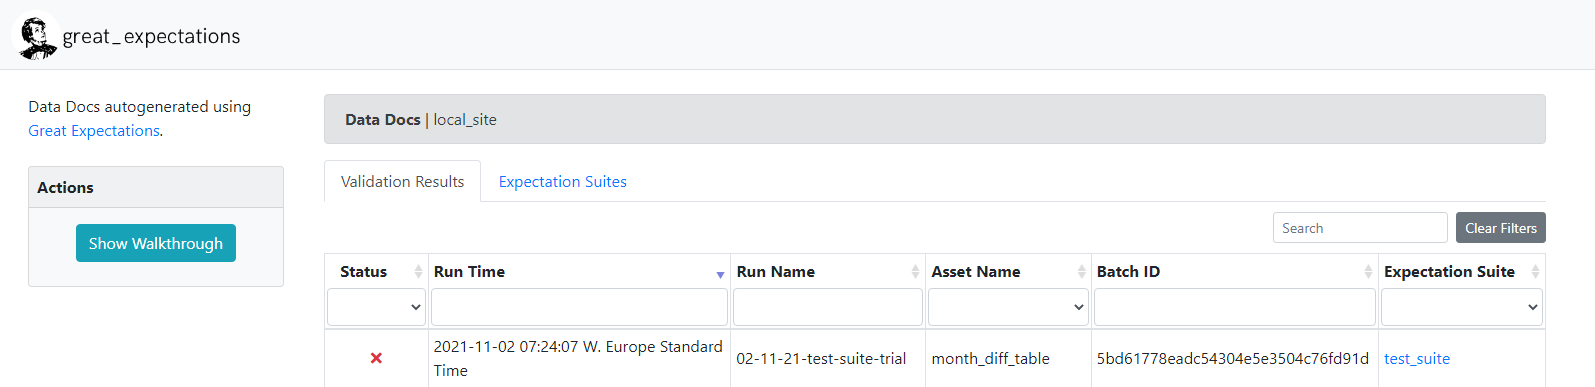
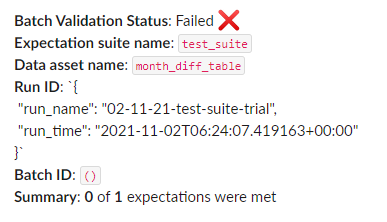
expectation_suite_ge_cloud_id:Here’s a screenshot of the results from the data docs. It clearly shows the run-time and run-name of the configured checkpoint and says it failed.
The configured test_suite with all the tests it encapsulates can also be viewed in the data docs
The slack notification received will look something like this.
Does GE support storing failed records?
Depending on your test configurations, you can get to know if a test failed or not, and retrieve a sample of the failing values, but GE doesn’t return an identifier of a record to enable you to trace back the exact failed records. You would have to manually get that.
What are the challenges faced while exploring the tool?
There were major architectural changes between the old GE version (v2) and the new one (v3). The documentation was lacking and mixed between the two versions which was vey confusing. In addition to that, not every available feature has been fully tested yet and the community (5000+) is relatively small to exchange expertise
However, the number of their slack channel members quadrupled in the past year – more people are interested in exploring the library and believe in its capabilities. Also, It is worth noting that when we first started exploring GE, it had far more unclear and missing documentation than it does now. In the span of two months, a lot has improved in their documentation and tool features, but there is still a lot more left for GE to be considered a well-documented tool in our opinion.
After we have explored GE, let us now move to DBT and check how can we perform the same test using DBT.
Data Built Tool [0.20.2] and jinja2 [2.11.3]
The prerequisites to start using DBT are knowledge in SQL and Jinja. For those of you unfamiliar with Jinja, using Jinja turns your dbt project into a programming environment for SQL, giving you the ability to do things that aren't normally possible in SQL, like creating for-loops or if conditions.
DBT comes with only 4 built-in tests: not null, unique, accepted values, and relationships. However they don’t follow the data testing features we described above. Relationships violates the descriptive name rule. It isn’t clear what the relationships test does. Relationships is supposed to be a referential integrity check.
Just like in GE we needed to configure our data source before we started testing, we’ll do the same in DBT. When you install DBT, it automatically creates a profile.yml file in the following directory. C:\Users\yourname\.dbt. This is where you’ll add your data sources and credentials. We have only one data source configured called snowflake.
snowflake:
	target: dev
	outputs:
		dev:
			type: snowflake
			account:

			# User/password auth
			user:
			password:

			role:
			database:
			warehouse:
			schema:
			threads: 10
			client_session_keep_alive: False
			query_tag: 'snowflake_tag'
Then you need to add the profile with the name of your data source in the dbt_project.yml file as follows
profile: 'snowflake'Features of DBT
-
Severity level
You can specify if the test results are less than 100 records then the severity level should be a warning, however if more than that then the severity level should be an error.
It’s important not to confuse that with themostlyparameter in GE.Mostlyis a percentage of the amount of records you require to be true in relation to the total amount of records in your table; however, here the severity level is determined by the number of records returned from your test irrespective to the total amount of rows in your original table.
There is nomostlyparameter in DBT, if you want this parameter, you’ll have to implement it yourself. Luckily, it’s not hard to implement. In the GitHub repo dbt_test, you’ll find in the macros folder a file calledtest__unique_combination_of_columns.sqlwhere we reimplemented thedbt.utils unique_combination_of_columns testwith themostlyparameter added. -
Storing failures
You can store failing test records in your database. However, when you run that test again, that table will be overridden. Therefore, if you want to save historical failures you will need to move the results from that temp table created by DBT to a more permanent one. -
Where config
Enables you to add a where condition to any test you created -
Debugging your test
Every time you run your tests, the compiled version is stored in the\target\compileddirectory. By checking the compiled version of each test, you can easily detect any errors or even paste the query in your database to check result output there, by complied version we mean the raw SQL statement used by the test after compiling jinja syntax. -
Dbt packages
They are in fact standalone dbt projects, with tests and macros that tackle a specific problem area. As a dbt user, by adding a package to your project, the package’s tests and macros will become part of your own project. All you’ll need to do is add a packages.yml file and add the package configuration you want from dbt’s package hub.
Packages likedbt-utilsanddbt-expectationsoffer more tests to add to your project than the four default ones.dbt-expectationsis where you get best of both words; GE’s tests available for use in dbt; however, themostlyparameter isn’t configured there too. Even if you aren’t going to use any of these package’s tests, we do recommend taking a look at their source code and how each test is implemented, before you create your own. This will help you navigate through what you can accomplish with DBT and Jinja.
Now back to how we can test our yearly_grades table in DBT.
Simply, we create a test in the macros folder called test__expect_continuous_time_series.sql and write our SQL query stating that the month_diff column shouldn’t equal to one. If that test returned any values then it automatically fails and the failed records will be stored in our snowflake database under the DBT_Test__Audit schema because we’ve set the store_failures flag to true in the test. We will then have to invoke that test on the yearly_grades model specifying the test inputs. It’s as simple as that.
Creating test expect_continuous_time_series
% test expect_continuous_time_series(model, partition_by_columns, date_column) %}
		{{ config(store_failures = true) }}
        {%- set partition_by_columns=partition_by_columns | join(', ') -%}
        with windowed as (
				select {{partition_by_columns}},{{date_column}} as curr_date,
                lag({{date_column}}) over (
					PARTITION BY {{partition_by_columns}} ORDER BY {{date_column}}
				) as previous_date
			    from {{ model }}
        ),
        validation_errors as (
			SELECT {{partition_by_columns}},previous_date, curr_date, DATEDIFF(MONTH, previous_date, curr_date) AS MONTH_DIFF FROM windowed
			WHERE MONTH_DIFF <> 1

		)

select * from validation_errors

{% endtest %}
Important things to note here:
- Every Jinja variable is replaced at runtime with the user input parameters.
{{config(store_failures = true) }}is a way to ensure that whenever that test is invoked on any model, the failure records are stored in the DB.
Invoking test on model trans__yearly_grades
models:
    - name: trans__yearly_grades
      description: "dummy_yearly_grades"
      tests:
        - expect_continuous_time_series:
            partition_by_columns:
                - student_name
            date_column: date
Important things to note here:
When a test is invoked on a model, by default the model name is passed to the test. You do not need to add the model name as a user input parameter. The same concept applies if a test is invoked in a column in a model; the column name as well as the model name are passed by default.
Example of the stored failed records stored in the DB

Now that I’ve given you an overview of how to test the yearly_grades table with both DBT and GE, you now have a feel of the difference between both tools. In GE, you can't view the failed records, but in DBT you can.
What we still haven’t explored in both tools
We haven’t tried automating the tests in both DBT and GE, so we won’t be able to speak more about that feature. We also haven’t checked the ability to send a DBT slack notification on either failure or success so can’t speak about that either. Feel free to send us any comments with any extra features you’ve explored in either tools and a feedback of your overall experience as we would also love to add to our knowledge.
Custom Expectations
Since DBT uses SQL – the language your DB initially understands, it’s very easy to create a custom test; however, it’s not as easy to create one in GE. We haven’t discussed creating a custom expectation in GE here in this article because it would consume a lot of time and frankly there is a lot more to understand before being able to create a custom test. We recommend viewing GE’s webinar here where they discussed theoretically how a test behaves in GE as a start to how to create your own custom test.
Wrap things up
Each one of these two tools have features that outweigh the other. GE has the data docs feature, while DBT does not offer data documentation for tests. DBT is easier to learn and start working than GE and has a larger community and is well-documented. In addition, if you’re already using DBT’s other features, it would also make sense to use its testing feature as well – why should your team consume time learning another tool? However, GE’s documentation and features are improving – We wouldn’t be surprised if by the start of next year they have a lot more to offer.
In conclusion, always monitoring your data quality is very important.
In the context of Machine learning bad data can backfire twice – first when training predictive models and second in the new data used by that model to inform future decisions. In addition to that, the distribution of data changes with time - mean and standard deviation could change, which would require you to retrain your model so it’s always good to track your data quality.
There’s also another aspect to consider. A team has fixed resources. A fixed number of data analysts, analytics engineers, and data engineers with a fixed number of hours in each day. With fixed resources but growing time needed for maintenance, a point is naturally reached where everyone is spending all of their time maintaining the system without any time left to build out new features.
\[Working\ hours = Team\ Resources \times (Maintenance + New\ Features) \]
So if there are tools already existing that help us to test our data, we shouldn’t be lazy in doing so.
Github Repository (DBT): https://github.com/raisaenergy/dbt_demo